# Renderer
 In
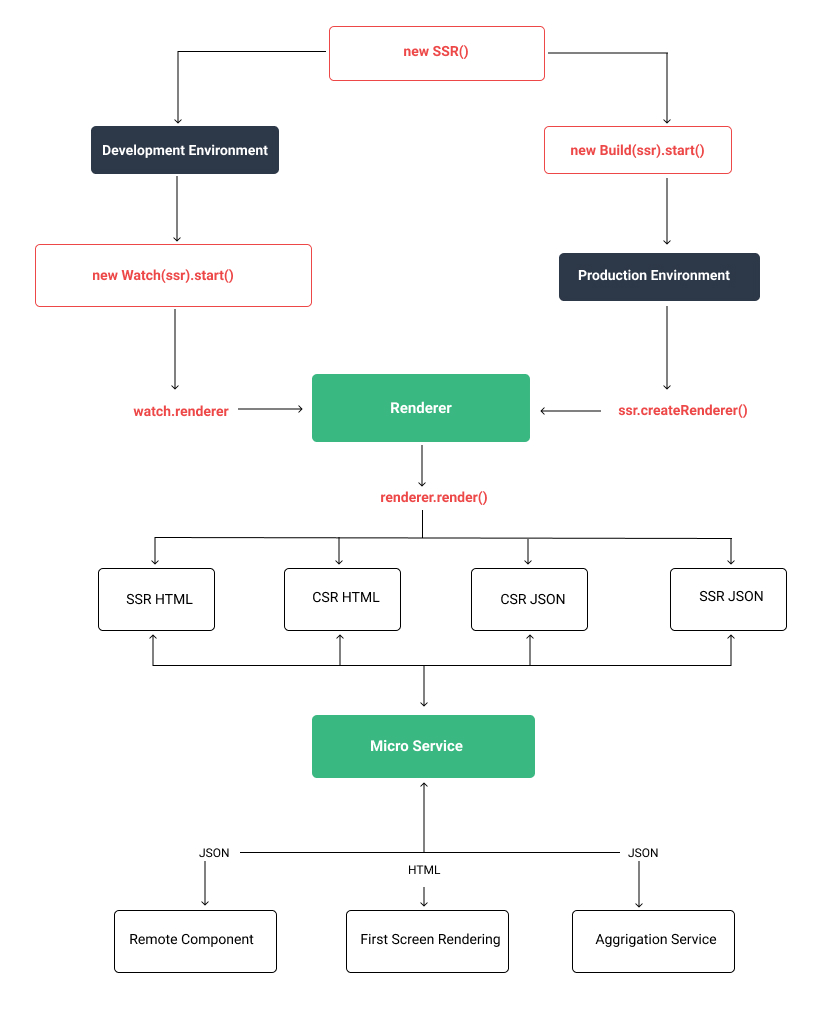
In Genesis, the core is the renderer, which provides the most basic rendering capabilities. With it, you can implement micro frontend, micro service, remote components, first screen rendering, and even use with React, EJS, etc.
# How can it collaborate with you?
-If you are using traditional back-end rendering, you need to do SEO, but you want to introduce Vue in some layouts and some pages, then renderer.renderJson() is enough to pass the rendering results to the template engine for back-end rendering.
- If you are a mid-to-back-end system and the business systems are all concentrated in one project, you want to be able to split the services according to the business, then
<remote-view :fetch="fetch" />sufficient - If you are a CSR rendering project, then
renderer.renderHtml({ mode: 'csr-html' })sufficient - If you are a SSR rendering project, then
renderer.renderHtml({ mode: 'ssr-html' })sufficient
If you want to be a micro frontend, micro service, then renderer is inherently equipped with such capabilities, you can use it as a tool function, you can access your service through various protocols such as HTTP, RPC, etc. Then use it for rendering
# Create a Renderer
# Development Environment
import { SSR } from '@fmfe/genesis-core';
import { Watch } from '@fmfe/genesis-compiler';

const start = async () => {
    const ssr = new SSR();
    const watch = new Watch(ssr);
    await watch.start();
    const renderer = watch.renderer;
    // After getting the renderer, do something ....
};

start();
If you are creating a project for the first time, the program will automatically create a basic Vue template in the project root directory.
.
├── src
│   ├── app.vue           Entrance page
│   ├── entry-client.ts   Client entry file
│   ├── entry-server.ts   Server entry file
│   └── shims-vue.d.ts    TS statement for vue file
│
└── package.json
Because in the actual development environment, we still need static resource files and hot updates, the watch object also provides corresponding middleware use, if you use the Express framework, you can directly use
/**
 * Static resource middleware
 */
app.use(watch.devMiddleware);
/**
 * Hot update middleware
 */
app.use(watch.hotMiddleware);
If you use Koa, or other frameworks, you need to wrap a layer of middleware on the corresponding framework.
# Production Environment
After the development is completed, the production environment needs to be released. We always need to compile the code in advance, so that when the user visits, it can be quickly rendered quickly, so the first step we need to compile the code first
import { SSR } from '@fmfe/genesis-core';
import { Build } from '@fmfe/genesis-compiler';

const start = () => {
    const ssr = new SSR();
    const build = new Build(ssr);
    return build.start();
};

start();
note
Here you need to set the environment variable NODE_ENV to production, otherwise the compiled code is in development mode, and the runtime performance will be very poor.
NODE_ENV=production ts-node index.ts
After executing the above compile command, we will get a dist directory where our compiled code is placed. If you want to change the address of the compilation output, or the name of the application, you can click here to learn more
.
├── dist
│   ├── ssr-genesis                           Application Name
│   │   ├── client                            Client resource files
│   │   |   ├── js                            script
│   │   |   ├── css                           style
│   │   |   ├── images                        image
│   │   |   ├── medias                        media resources
│   │   |   └── fonts                         Font file
│   │   ├── server                            Server resource file
│   │   │   ├── vue-ssr-client-manifest.json  Client build manifest
│   │   │   └── vue-ssr-server-bundle.json    Server application package
│
└── package.json
After the code is built, we can create a renderer directly in the production environment.
import { SSR } from '@fmfe/genesis-core';

const start = async () => {
    const ssr = new SSR();
    const renderer = ssr.createRenderer();
    // After getting the renderer, do something...
};

start();
In the production environment, static resources are based on the file name generated by the content hash, so when setting a static directory here, you can set a strong cache
app.use(
    renderer.staticPublicPath,
    express.static(renderer.staticDir, {
        immutable: true,
        maxAge: '31536000000'
    })
);
# Use of renderer
So far, whether it is a development environment or a production environment, we have already got a renderer, and then we can use the renderer to do some things.
# Rendering method
renderer.render().then((result) => {
    console.log(result.data);
});
In the default case, equivalent to the following
renderer.render({ url: '/', mode: 'ssr-html' }).then((result) => {
    console.log(result.data);
});
For more options about rendering methods, click here to learn
The renderer.render method is the bottom-most method of the renderer. The following functions are encapsulated based on it.
# Rendering middleware
If your business is relatively simple, you can directly develop through our middleware, it is just a simple SSR middleware.
note
If SSR rendering fails, the middleware will not help you downgrade to CSR
app.use(renderer.renderMiddleware);
# Render HTML
const result = await renderer.renderHtml();
console.log(result);
# Render JSON
const result = await renderer.renderJson();
console.log(result);
# Downgrade rendering
For a better user experience, when SSR rendering fails, we expect it to be downgraded to CSR mode. We can wrap a layer of the rendering method and print out the error message. You can even use some monitoring tools to push to your mailbox and SMS for alarm.
const render = (options: RenderOptions = {}) => {
    return renderer.render(options).catch((err: Error) => {
        // Print error message of failed rendering
        console.error(err);
        const mode: RenderMode = options.mode || 'ssr-html';
        return renderer.render({
            ...options,
            mode: mode.indexOf('html') ? 'csr-html' : 'csr-json'
        });
    });
};
const result = await render();
console.log(result.data);
# Use routing
When calling the rendering function, pass in the address and routing mode to be rendered, because when using a remote component, we may not want this component to use historical mode rendering, or may use abstract mode rendering, it is best to use it Make dynamic parameters to control.
const result = await render({ url: '/', state: { routerMode: 'history' } });
console.log(result.data);
note
vue-router does not support creating multiple historical route instances on one page, otherwise when you call the router.push() method, it will create multiple History, in order to solve this problem, please use the route of genesis-app
# router.ts
Newly added routing configuration file, learn more click here
npm install vue-router
import Vue from 'vue';
import Router, { RouterMode } from 'vue-router';

Vue.use(Router);

export const createRouter = (mode: RouterMode = 'history') => {
    return new Router({
        mode: mode,
        routes: [
            // Configure your route
        ]
    });
};
# entry-server.ts
Modify our server entry file
import { RenderContext } from '@fmfe/genesis-core';
import Vue from 'vue';
import App from './app.vue';
import { createRouter } from './router';

export default async (renderContext: RenderContext): Promise<Vue> => {
    // Read the passed route pattern
    const mode = renderContext.data.state.routerMode;
    // Create route
    const router = await createRouter(mode);
    // Set the rendering address
    await router.push(renderContext.data.url);
    // Create a Vue instance
    return new Vue({
        // Incoming routing object
        router,
        renderContext,
        render(h) {
            return h(App);
        }
    });
};
# entry-client.ts
Modify our client entry file
import { ClientOptions } from '@fmfe/genesis-core';
import Vue from 'vue';
import App from './app.vue';
import { createRouter } from './router';

export default async (clientOptions: ClientOptions): Promise<Vue> => {
    // Read the routing pattern delivered by the server
    const mode = clientOptions.state.routerMode;
    // Create route
    const router = await createRouter(mode);
    // Set the rendering address
    await router.push(clientOptions.url);
    // Create a Vue instance
    return new Vue({
        // Incoming routing object
        router,
        clientOptions,
        render(h) {
            return h(App);
        }
    });
};
# app.vue
Modify our view file to support route rendering
<template>
    <div class="app">
        <h2>Hello world!</h2>
        <p v-if="show" @click="close" class="text">
            {{ installed ? 'The client should be installed successfully, click me to close!' : 'Not Installed' }}
        </p>
        <router-view />
    </div>
</template>
# Summarize
The above tutorials teach you how to use some basic renderers. With it, you can use it with various server frameworks. This tutorial, here provides a complete demo, click here to learn more.